De Colores Creative Designers

The right kind of designers for your business.
ankara escort ankara escort çankaya escort çankaya escort escort bayan çankaya istanbul rus escort eryaman escort ankara escort kızılay escort istanbul escort ankara escort ankara escort escort ankara istanbul rus Escort atasehir Escort beylikduzu Escort Ankara Escort malatya Escort kuşadası Escort gaziantep Escort izmir Escort

Our latest works:

SunCakeMom

SunCakeMom - Sugar Free Recipes

Jool

By

Crock Pot Grain Free Low Carb Granola

Prep Time 10 minutes
Cook Time 2 hours
Total Time 2 hours 10 minutes
Servings 12 @ 1/2 cup
Calories 327 kcal
Ingredients
1/3 cup coconut oil
1 tsp vanilla extract
1 tsp vanilla stevia
1/2 cup almonds
1/2 cup walnuts
1/2 cup pecans
1/2 cup hazelnuts
1 cup sunflower seeds
1 cup pumpkin seeds
1 cup unsweetened shredded coconut
1/2 cup Swerve granular sweetener or other sugar free sub of choice
1 tsp ground cinnamon
1 tsp salt
Instructions
Turn Crock Pot to low and add coconut oil and allow it to melt.
Once melted add vanilla extract and stevia.
Stir well before adding nuts, seeds and coconut.
Stir the granola mixture well to make sure all is coated.
Whisk Swerve, cinnamon and salt together then sprinkle over the nut and seed mixture.
Cover and cook on low 2 hours or until you can smell them and they appear browned and toasted.
Stir every 30 minutes.
Pour and spread out onto a baking pan to cool and/or refrigerate.
Keep stored in a covered container.Christmas is the time to be jolly, and there's nothing jollier than Unsplash's collection of Christmas images. Trees, snow, christmas lights, and magical feasts: Unsplash has images of it all, and they're totally free to use.
Nutrition Facts
Crock Pot Grain Free Low Carb Granola
Amount Per Serving (1 serving)
Calories 327
Calories from Fat 279
% Daily Value*
Fat 31g
48%
Saturated Fat 11g
69%
Sodium 198mg
9%
Potassium 271mg
8%
Carbohydrates 8g
3%
Fiber 4g
17%
Sugar 1g
1%
Protein 7g
14%
Vitamin A 5IU
0%
Vitamin C 0.7mg
1%
Calcium 44mg
4%
Iron 2mg
11%
* Percent Daily Values are based on a 2000 calorie diet.‘Tis the season of rhubarb. And strawberry. And blood orange. Praise be. Amen.

By

Low Carb Keto Peanut Butter Cookies

These flourless Keto peanut butter cookies are ready in no time at all! All you need for this super simple low carb cookie recipe are 4 ingredients.
Prep Time
10 mins
Cook Time
10 mins
Total Time
20 mins
Course
Dessert, Snack
Cuisine
British
Servings
20 cookies
Calories
78 kcal

INGREDIENTS

1x
2x
3x

1 cup crunchy peanut butter (100% peanuts) (250g)

1/2 cup granulated sweetener (100g)

1 egg large


optional: 1/2 tsp cinnamon
INSTRUCTIONS

Preheat oven to 180 Celsius / 350 Fahrenheit.
Put all ingredients in a bowl and mix with a fork.
Roll small balls of dough (ca 15g each) with your hands (or use a small cookie scoop) and flatten them on a baking sheet.
Wet a fork and press on cookies to create a criss cross pattern.
Bake 8 -10 minutes, until the edges are firm. (8 minutes = soft centre, 10 minutes = overall crunchy)
Let cool completely before eating. They are very soft when just out of the oven, but will become crunchy once cooled.
Store in an airtight container.
VIDEO
Try getting hold of a peanut butter that contains 100% peanuts and nothing else. If you have a food processor, you can even make your own. I mixed a bit of sea salt into the dough and sprinkled a bit more on top. It”s the salted caramel effect – sweet and salty together are just crazy good.
1.6 g net carbs per cookie.
NUTRITION
Calories: 78kcal
Protein: 3.7g
Fat: 6.9g
Fiber: 0.7g
Sugar: 1.4g

By

CHILLED CALAMARI SALAD WITH LEMON AND PARSLEY

121.6 Cals 18.3 Protein 7.9 Carbs 1.7 Fats
YIELD:4 SERVINGS
COURSE:Appetizer, Lunch
CUISINE:Italian
INGREDIENTS
1/4 cup red onion, minced
1/2 cup celery, chopped
1/2 cup roasted red peppers, chopped
1/4 cup fresh parsley, minced (no stems)
1 clove garlic, sliced
1 1/2 lemons
1 1/4 tsp red wine vinegar
salt and fresh pepper to taste
1 lb fresh squid, tube and tentacles cleaned
INSTRUCTIONS
Rinse squid and slice tubes into 1/2 inch rings.
Leave the tentacles whole and set aside.
Prepare a bowl of water with ice.
In a medium bowl combine onion, garlic, celery, red peppers, parsley, lemon juice, vinegar, salt and fresh pepper.
Bring a medium pot filled with water and a pinch of salt to a boil.
Add calamari all at once and cook until tender yet cooked, (I test it by tasting a ring) about 45 – 60 seconds.
Quickly drain when cooked and add to the ice bath until cool, 4 – 5 minutes.
Combine squid with the salad and toss well.
Taste for salt and add additional seasoning and lemon juice if needed.
Cover and refrigerate at least an hour.
NOTES
Makes about 3 1/2 cups.
Calories: 121.6kcal, Carbohydrates: 7.9g, Protein: 18.3g, Fat: 1.7g, Sodium: 66mg, Fiber: 0.9g, Sugar: 1.2gBlue Smart Points:0Green Smart Points:2Purple Smart Points:0Points +:2

By

Are Hot Cross Buns Better With Icing Or Without?

Are Hot Cross Buns Better With Icing Or Without?

With Icing

Pros

Those who prefer their hot cross buns with icing often cite the sweet, sticky glaze as the main reason for their choice. The icing adds a layer of flavor and texture to the bun, making it more decadent and indulgent. Additionally, the icing can help to maintain the bun moist, stopping it from drying out.

However, there are also those who choose their hot cross buns with out icing. They argue that the icing may be too candy and overpowering, and that it could possibly mask the flavour of the bun itself. Additionally, some individuals discover that the icing could make the bun too sticky and troublesome to eat.

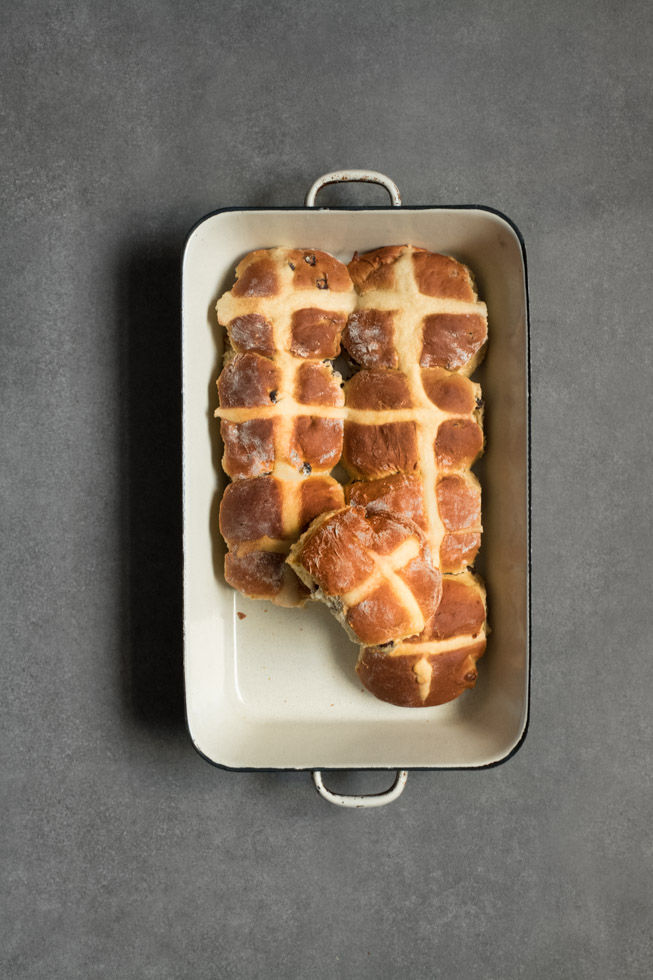
Ultimately, the decision of whether or not or to not have icing on your hot cross bun is a matter of private choice. There isn’t any right or incorrect reply, so select whichever option you get pleasure from essentially the most.

Adds sweetness and flavor

Icing adds sweetness and flavor to hot cross buns, however it is a matter of personal preference whether or not or not it makes them better.

Some folks choose the plain taste of the buns, while others enjoy the added sweetness and flavor of the icing.

Ultimately, the finest way to determine whether or to not add icing to your hot cross buns is to strive them both methods and see which you favor.

Creates a glossy, aesthetically pleasing appearance

Icing is a sugary glaze applied to baked goods to enhance their taste and look. Hot cross buns are traditionally served with out icing, however many individuals favor to add a layer of sweetness and shine.

Icing may help to create a glossy, aesthetically pleasing appearance on hot cross buns. It also can help to guard the buns from drying out and hold them moist and flavorful for longer. The type of icing used can vary, with widespread choices including sugar icing, chocolate icing, or cream cheese frosting.

Ultimately, the choice of whether or to not ice hot cross buns is a matter of private choice. Some people choose the basic taste and texture of plain hot cross buns, whereas others enjoy the added sweetness and visual enchantment of iced buns.

Can be flavored with various toppings (e.g., chocolate chips, sprinkles)

With Icing

Hot cross buns with icing are a classic Easter deal with. The sweet, sticky icing adds a scrumptious layer of taste to the buns, and it can be flavored with various toppings (e.g., chocolate chips, sprinkles) to create quite so much of completely different treats.

Pros:

  • The icing adds a delicious layer of flavor to the buns.
  • The icing may be flavored with numerous toppings to create quite so much of different treats.

Cons:

  • The icing may be messy to eat.
  • The icing can make the buns harder to retailer.

Cons

Cons of Icing on Hot Cross Buns:

Overwhelms the flavour: Icing could be overly candy and masks the refined spices and tangy fruit in the bun.

Creates a sticky mess: Icing can drip and make buns difficult to handle and eat neatly.

Hides the cross: The traditional cross on the bun may be obscured by a thick layer of icing.

Artificial ingredients: Some icings include synthetic flavors, colours, and preservatives that may detract from the pure taste of the bun.

Reduced shelf life: Icing can make buns extra vulnerable to spoilage and mildew, decreasing their shelf life.

Messy to take away: If you prefer buns without icing, eradicating the sticky layer could be time-consuming and irritating.

Can make buns overly sugary

With icing, hot cross buns can become overly sugary and sweet, overpowering the delicate flavors of the spices and fruit.

The icing also can mask the feel of the bun, making it less enjoyable to eat.

Without icing, hot cross buns retain their traditional, more balanced taste profile, allowing the spices and fruit to shine via.

The texture of the bun is also more pronounced, offering a extra satisfying eating experience.

May masks the flavor of the spices

In the battle of hot cross buns, some choose the classic simplicity of unadorned buns, while others relish the sugary embrace of icing. Icing could mask the delicate flavors of spices, transforming the bun into a treat that tantalizes the taste buds with its candy, sugary exterior. However, this sugary coating also can diminish the fragile concord of spices that outline the true essence of a hot cross bun.

Without icing, the flavors of cinnamon, nutmeg, and ginger take middle stage, creating a symphony of heat aromas. The spices are more pronounced, mingling and dancing on the palate, evoking the essence of the season. The bread’s texture is delicate and yielding, offering the proper canvas for the spices to shine.

With icing, the spices retreat into the background, masked by a cloying sweetness. The icing transforms the bun right into a dessert, overpowering the subtleties of the spices. The texture turns into dense and sticky, shedding the sunshine and ethereal high quality that characterizes a well-crafted hot cross bun.

Ultimately, whether or not or to not grace a hot cross bun with icing is a matter of private preference. For those that search a sweet and indulgent treat, icing could be the excellent adornment. However, for many who desire the true taste of spices, allowing the bun to stay unadorned is the best alternative.

Can become messy when eating

With Icing

– Can get messy when eating

Without Icing

Pros

– No added sugar: Without icing, hot cross buns have much less added sugar, making them a more healthy choice for these seeking to scale back their sugar intake.

– More conventional flavor: The conventional hot cross bun is made without icing, allowing the spices and fruit flavors to shine by way of extra prominently.

– Less mess: Without icing, there’s no risk of getting frosting in your palms or garments, making them easier to eat on the go or in a messy surroundings.

– Greater variety: Hot cross buns with out icing may be paired with a selection of toppings, similar to butter, cheese, or jam, allowing for extra customization in taste and texture.

– Healthier sheen: Without icing, hot cross buns have a extra pure, browned sheen, which is achieved by way of the utilization of egg wash throughout baking.

Preserves the traditional taste and aroma

Without icing, hot cross buns preserve their conventional taste and aroma.

The spices, such as cinnamon and nutmeg, are extra prominent, and the cross on prime is more seen.

For those that choose a extra traditional taste, hot cross buns without icing are the way to go.

Allows the spices to shine through

Without Icing, Allows the spices to shine through

  • The spices in hot cross buns are a key part of their taste, and icing can sometimes masks the style of the spices.
  • Without icing, the flavors of the spices are allowed to shine through, giving the buns a more advanced and nuanced flavor.
  • This may be especially appealing to people who enjoy the taste of spices, or who need to experience the full flavor of the buns with none added sweetness.

Creates a light-weight and ethereal texture

Without icing, hot cross buns have a light-weight and airy texture, permitting the subtle flavors of the spices to shine by way of. The buns are typically soft and fluffy, with a barely crispy exterior. The lack of icing allows the natural sweetness of the dough to take center stage, making a balanced and flavorful deal with.

Cons

Cons of Hot Cross Buns Without Icing

  • Drier and less flavorful
  • Can be more crumbly and fewer satisfying
  • May not have the same visible enchantment as buns with icing
  • Can be more difficult to eat with out making a mess
  • May not be as popular with youngsters or those that prefer a sweeter bun
  • Can be much less moist and fluffy
  • May not have the same stage of sweetness to stability out the spices
  • Can be tougher to search out in stores
  • May not be as festive or traditional
  • May be harder to unfold fillings or toppings on
  • May not be as visually interesting or eye-catching
  • Can be extra susceptible to drying out
  • May not have the same degree of perceived value as buns with icing
  • May be less versatile in terms of pairings with different foods or drinks
  • May be much less more likely to be loved by a wider vary of people
  • Can be more difficult to tell apart from other types of buns
  • May not have the same degree of cultural significance or symbolism
  • May be much less prone to be handed down through generations as a traditional recipe
  • Can be more difficult to seek out recipes for with out icing
  • May not be as well-documented or have as a lot historic significance
  • Can be more difficult to attain the specified level of browning or crustiness
  • May not be as straightforward to make or require extra talent to achieve the specified results
  • Can be extra time-consuming to make
  • May not be as cost-effective as buns with icing
  • May not be as widely obtainable in retail shops or bakeries
  • May not be as in style with industrial bakeries or meals service establishments
  • Can be harder to mass-produce
  • May not be as shelf-stable or have as lengthy a shelf life as buns with icing
  • Can be more prone to turn out to be stale or moldy

May be perceived as dry by some

Without icing, hot cross buns may be perceived as dry by some due to their dense and doughy texture.

The lack of icing removes the sweetness and moisture that icing offers, leading to a bun that could be crumbly and fewer palatable.

However, some individuals might prefer the simplicity and traditional flavor of hot cross buns with out icing, appreciating the refined spice and the bready texture.

Ultimately, the choice for iced or un-iced hot cross buns is a matter of private style.

Can seem much less visually appealing

Without icing, hot cross buns can appear less visually appealing, as the icing provides a vibrant and contrasting component to the in any other case brown bun.

The white or pale yellow icing creates a stark contrast against the dark brown crust, making the buns more eye-catching and appetizing.

Without icing, the buns could seem more monotonous and less visually interesting, potentially making them much less appealing to some customers.

May not be suitable for these with a candy tooth

Without icing, hot cross buns are a extra traditional and authentic deal with. The easy, understated taste of the bun allows the spices and fruit to shine through, making a more balanced and complicated style profile. The lack of icing also implies that the buns are less candy, making them a more versatile snack or breakfast choice. They can be loved on their own or paired with quite lots of toppings, similar to butter, jam, or cheese.

Hot cross buns without icing are also a healthier alternative. Icing provides unnecessary sugar and calories to the buns, making them much less suitable for those who are watching their weight or sugar intake. The buns are additionally easier to digest with out the added sugar, making them a greater possibility for these with sensitive stomachs.

While hot cross buns with icing may be more visually interesting, these with out icing provide a more authentic, healthier, and versatile experience. They are a traditional treat that can be loved by folks of all ages and dietary preferences.

By

POLLO IN POTACCHIO (BRAISED CHICKEN WITH TOMATOES AND ROSEMARY)

221 Cals 29.5 Protein 6 Carbs 7.5 Fats
PREP TIME:
10 mins
COOK TIME:
1 hr 30 mins
TOTAL TIME:
1 hr 40 mins
YIELD:10 SERVINGS
COURSE:Dinner
CUISINE:Italian
Pollo in Potacchio is an Italian braised chicken dish made with tomatoes, rosemary and garlic. The chicken cooks until it”s fork tender, which is great served with pasta, noodles, spaghetti squash or polenta.
INGREDIENTS
10 skinless chicken thighs on the bone, 5 oz each
kosher salt and fresh black pepper
3 – 4 small sprigs fresh rosemary
1 tbsp + 1 tsp olive oil
1 large yellow onion, finely chopped
4 garlic cloves, chopped
1 celery stalk, chopped
1 carrot, chopped
pinch red pepper flakes, optional
2 cups Imported crushed tomatoes, Tuttoroso
1/4 tsp dried marjoram
1/4 cup dry white wine, Omit for Whole30
2 cups low sodium, fat free chicken broth
kosher salt and fresh black pepper
INSTRUCTIONS
Dutch Oven
Lightly season the chicken with salt and fresh pepper. Place a Dutch Oven or large heavy pot on medium-high heat. Add 1 tbsp oil, when hot add the chicken and sear until browned on all sides, about 6-7 minutes on each side. Transfer chicken to a dish and set aside.
Sauté garlic and onions (and red pepper flakes if using) in remaining oil; sauté until golden, about 3 minutes, stirring occasionally. Add celery and carrots and saute on medium-low for about 2-3 minutes, until soft. Add the wine and chicken broth, scraping any caramelized bits from the bottom with a wooden spoon.
Add tomatoes, marjoram, reduce heat to low, adjust salt and pepper to taste and simmer for 30 minutes.
Add the chicken and rosemary to the sauce, partially cover and cook slowly on low heat for another 25 – 30 minutes, stirring occasionally, adding water if needed.
Slow Cooker:
Start with the same directions step 1 and 2 on the stove, reducing the chicken broth to 1 cup. Transfer to the slow cooker with the remaining ingredients and cook on low for 8 hours.
Instant Pot:
Lightly season the chicken with salt and fresh pepper. Press saute on the Instant Pot and add 1/2 tbsp oil,  brown half of the chicken and sear until browned on all sides, about 6-7 minutes on each side. Transfer chicken to a dish and set aside, repeat with the remaining 1/2 tbsp oil and chicken. Set aside.
Add remaining teaspoon oil, add garlic, onions (red pepper flakes if using) celery and carrots and saute on medium-low for about 3 to 4 minutes, until soft. Add the wine and 1 cup chicken broth, scraping any caramelized bits from the bottom with a wooden spoon.
Add tomatoes, marjoram, adjust salt and pepper to taste and mix, return the chicken to the pot, add the rosemary to the sauce, cover and cook high pressure 30 minutes, natural release.
Serving: 3oz chicken, 1/2 cup sauce, Calories: 221kcal, Carbohydrates: 6g, Protein: 29.5g, Fat: 7.5g, Saturated Fat: 2g, Cholesterol: 133mg, Sodium: 362mg, Fiber: 1.5g, Sugar: 3gBlue Smart Points:4Green Smart Points:5Purple Smart Points:4Points +:5

By

CREAMY GRAPE DESSERT

171 Cals 5.5 Protein 34 Carbs 8 Fats
PREP TIME:
10 mins
TOTAL TIME:
25 mins
YIELD:8 SERVINGS
COURSE:Dessert
CUISINE:American
Warning! This dessert is highly addictive and hard to stop eating! Don”t be fooled by the humble ingredients, this is easy to make, very refreshing, and is perfect to bring to a BBQ. Truthfully, the first time I heard of this grape dessert, the ingredients did not appeal to me. But when I tasted it, OMG! This is one of those recipes you’ll be making again and again and chances are you probably have all the ingredients in your kitchen. Easily doubles for more people.
INGREDIENTS
Ingredients:
1 lb green seedless grapes, washed and dried well
1 lb red seedless grapes, washed and dried well
8 oz fat free Chobani Greek yogurt
4 oz light cream cheese, softened
1/4 cup agave, or sugar
1 teaspoon vanilla extract
Topping:
2 tbsp brown sugar, packed
1/2 cup chopped walnuts, or pecans
INSTRUCTIONS
Cut grapes in half and set aside.
Mix yogurt, cream cheese, agave and vanilla until blended well.
Stir grapes into mixture, and pour in large serving dish.
Combine brown sugar and crushed walnuts. Sprinkle over top of grapes to cover completely.
Chill until ready to serve.
NOTES
Modified from Recipe Zaar.
Serving: 1/8th, Calories: 171kcal, Carbohydrates: 34g, Protein: 5.5g, Fat: 8g, Fiber: 1.5gBlue Smart Points:5Green Smart Points:6Purple Smart Points:5Points +:6

By

CHOCOLATE CHOCOLATE CHIP BANANA MUFFINS WITH GLAZE

Cottage cheese pancakes170.5 Cals 2.5 Protein 32 Carbs 5.5 Fats
PREP TIME:
15 mins
COOK TIME:
30 mins
TOTAL TIME:
45 mins
YIELD:12 SERVINGS
COURSE:Breakfast, Brunch, Snack
CUISINE:American
Any chocolate lovers out there? These double chocolate muffins made with bananas, chocolate chips and cocoa powder are moist and choco-licious! If you like the thought of eating chocolate for breakfast, then this is for you!
INGREDIENTS
3 1/2 ripe medium bananas, mashed
1/4 cup unsweetened apple sauce
1 1/4 cups unbleached all purpose flour
1/4 cup unsweetened cocoa powder
3/4 tsp baking soda
1/4 tsp salt
2 tbsp butter, softened
1/3 cup sugar
2 large egg whites
1/2 tsp vanilla extract
1/2 cup chocolate chips
2 tbsp confectioners sugar, optional
INSTRUCTIONS
Preheat oven to 325°. Line a muffin tin with 12 liners.
In a large mixing bowl cream butter and sugar with an electric mixer.
Add egg whites, bananas, apple sauce, vanilla, and beat at medium speed until thick. Scrape down sides of the bowl.
In a medium bowl, combine flour, cocoa powder, baking soda and salt with a wire whisk.
Add flour mixture to bananas, then blend at low speed until combined; do not over mix.
Fold in chocolate chips and pour batter into muffin tins.
Bake on the center rack for 30 minutes, or until a toothpick inserted in the center comes out clean.
If making the glaze, combine confectioner”s sugar and 1/4 to 1/2 tsp water to make a glaze. Drizzle over each muffin.
Serving: 1muffin, Calories: 170.5kcal, Carbohydrates: 32g, Protein: 2.5g, Fat: 5.5g, Saturated Fat: 3.5g, Cholesterol: 5mg, Sodium: 41.5mg, Fiber: 2g, Sugar: 16gBlue Smart Points:6Green Smart Points:6Purple Smart Points:6Points +:5

By

ROAST BEEF SANDWICH WITH MELTED CHEESE AND CARAMELIZED ONIONS

La Toque Parisienne - Recipe Book Covers badge branding design french cuisine french pastry graphic design illustration logo paris paris food pastry recipe recipe book recipe book cover recipe books typography vector365 Cals 36.5 Protein 23 Carbs 15 Fats
PREP TIME:
10 mins
COOK TIME:
20 mins
TOTAL TIME:
30 mins
YIELD:4 SERVINGS
COURSE:Lunch
CUISINE:American
If only this photo could capture just how incredibly delicious this garlic infused roast beef sandwich is with melted Swiss cheese and sweet caramelized onions!
INGREDIENTS
2 teaspoons olive oil
1 large white onion, sliced into rings
salt and black pepper, to taste
12 oz leftover garlic lovers roast beef, sliced thin
8 oz whole wheat Italian or French bread, cut into 4 pieces
4 oz reduced-fat Swiss Cheese or provolone
INSTRUCTIONS
Heat a 10-inch skillet over medium-low heat.
Stir in the oil and onions, season with salt and pepper and cook until slightly brown, turning occasionally about 15 to 17 minutes.
Slice the bread open, place 3 oz of cooked roast beef on each piece and top with 1/4 of the caramelized onions.
Top with cheese and place in the broiler for 1 to 2 minutes to melt the cheese, careful not to burn it.
NOTES
Makes 4 sandwiches, each have 2 oz bread, 3 oz roast beef, 1 oz cheese and 1/4 of the onions.
Serving: 1sandwich, Calories: 365kcal, Carbohydrates: 23g, Protein: 36.5g, Fat: 15g, Saturated Fat: 4g, Cholesterol: 80mg, Sodium: 200mg, Fiber: 2g, Sugar: 2gBlue Smart Points:8Green Smart Points:8Purple Smart Points:8Points +:9

By

Sugar Free Keto Custard (Dairy Free)

If you”re looking for a comforting sugar free dessert, you’re in for a treat! Here’s a dairy free vanilla custard that will make you swoon. Light, airy and silky-smooth!
Prep Time
20 mins
Cook Time
40 mins
Total Time
1 hr
Course
Dessert
Cuisine
British, French
Servings
5 5-ounce ramekins (6 4-ounce ramekins, 4 6-ounce ramekins)
Calories
372 kcal

INGREDIENTS

1x
2x
3x

2 cups / 500 ml coconut cream

5 egg yolks large

1/3 cup / 40g powdered erythritol (So Nourished)

1 vanilla bean pods or 2 tsp vanilla extract
INSTRUCTIONS

Split the vanilla bean in half and scrape out the seeds. Place the seeds in a mixing bowl and set aside.
Heat the coconut cream and the vanilla bean pod in a saucepan over a medium heat. Wait until the coconut cream simmers and the first bubbles begin to form on the top. Do not boil! Take off the heat and let cool for about 15 minutes. (If you are using vanilla extract instead of the vanilla bean, add it now.)
Add the egg yolks and the powdered erythritol to the mixing bowl with the vanilla bean seeds. Blend with an electric mixer for 2-3 minutes until the eggs are pale, frothy and double the size.
Slowly add the (lukewarm) coconut cream to the egg yolk mix, stirring continuously.
Heat the oven to 160 Celsius / 325 Fahrenheit.
Pour the custard mix into ramekins and place the ramekins into a casserole dish. Fill the casserole with boiled water that should reach half-way up the ramekins. This helps the custard to bake evenly and prevents splitting.
Bake for about 40 minutes until the tops are set and very lightly browned, but the centres are still jiggly.
Remove from the oven and cool to room temperature, then chill in the fridge until serving.
VIDEO
Best served cold! Keeps in the fridge for 3 days.
I sprinkled my custards with ground nutmeg, but this is optional. Cinnamon could also be good here!
The recipe makes 5 portions if you use 5 ounce ramekins. I made this batch with 6-ounce ramekins and found my portion to be VERY FILLING. Use smaller ramekins if you can.
Nutrition for 6 4-ounce ramekins: 4.1 g net carbs per portion
Nutrition for 4 6-ounce ramekins: 6.1 g net carbs per portion
NUTRITION
Calories: 372kcal
Protein: 6.2g
Fat: 37.8g
Sodium: 12mg
Potassium: 331mg
Fiber: 2.1g
Sugar: 0.1g

By

MAPLE ROASTED BUTTERNUT SQUASH

104 Cals 1 Protein 23 Carbs 2 Fats
COOK TIME:
40 mins
YIELD:4
COURSE:Side Dish
CUISINE:American
A simple Fall side dish, made with just 3 ingredients (butternut, pure maple syrup and oil) plus s + p!
INGREDIENTS
1 1/4 lbs butternut squash, peeled and diced 3/4-inch
1/2 tbsp olive oil or coconut oil
2 1/2 tbsp pure maple syrup
kosher salt and freshly ground black pepper
INSTRUCTIONS
Preheat the oven to 400°F.
In a large bowl, toss the butternut squash with oil, maple, salt and fresh ground pepper. Place in a baking dish, cover with foil and roast in the center of the oven for 25 minutes.
Remove foil, turn the squash and bake an addition 15 minutes, or until fork tender (time will vary depending on the size you cut the squash).
Makes 3 cups.
Serving: 3/4 cup, Calories: 104kcal, Carbohydrates: 23g, Protein: 1g, Fat: 2g, Sodium: 7mg, Fiber: 4g, Sugar: 7gBlue Smart Points:3Green Smart Points:3Purple Smart Points:3Points +:3